Roasted Broccoli with Blistered Grape Tomatoes

Roasted Broccoli with Blistered Grape Tomatoes | Yea Yea PuebloBroccoli. I have so many regrets about not trying it until I was an adult. Growing up, my single-dad didn’t really have the culinary skills necessary to promote healthy eating in a picky eater like myself. It’s okay though, because I fixed it and he’s making up for it by doing generous things like buying my husband a grill for father’s day! He is one proud grand-dad.

So, broccoli: it’s my go-to vegetable for a healthy side, snack, or entree.

My hopes are that Margot won’t be a picky eater like I was. As soon as she’s able to eat solids, I’ll be making her baby food myself. Over time, I plan on introducing her to a wide variety of foods, and re-introducing them to her until she’s acquired a taste for them. That’s pretty much how I learned.

20130617-IMG_5270-2

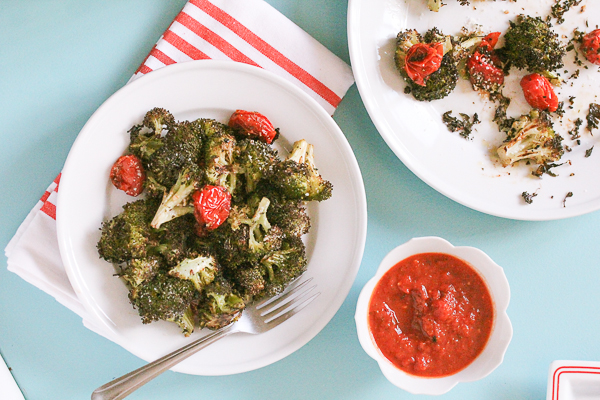
My favorite side (and occasional lunch) is this roasted broccoli with blistered grape tomatoes dish. It’s great on its own, dipped in marinara, or tossed into pasta.

Roasted Broccoli with Blistered Grape Tomatoes | Yea Yea PuebloRoasted Broccoli with Blistered Grape Tomatoes | Yea Yea PuebloRoasted Broccoli and Blistered Grape Tomatoes Recipe:

Ingredients:

3-4 cups broccoli

1 cup grape tomatoes

1 tablespoon minced garlic

1/2 teaspoon dried oregano

Salt & Pepper to taste

1 tablespoon grated parmesan — more or less to taste

Directions: 

Preheat oven to 425 F.

Slice broccoli into florets, then in half so they lay flat. In a large mixing bowl, toss broccoli and grape tomatoes in olive oil. Season with dried oregano, and salt & pepper.

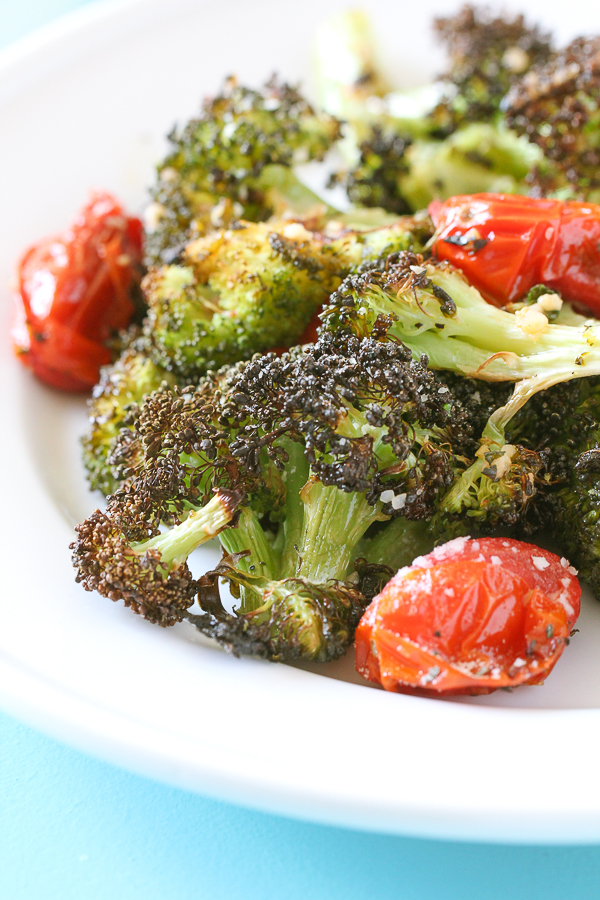
Line a baking sheet with parchment paper (for easy clean up) and spread the veggies evenly over the pan. Lay the broccoli on their flat sides, and bake for 20-25 minutes until the broccoli is browned and the tomatoes are blistered. Check in on your creation about 18 minutes in to make sure the tomatoes don’t shrivel up into oblivion.

Use tongs to serve (be gentle!), and dust generously with grated parmesan.

Notes:

I used freshly dehydrated oregano in this dish because I happened to have it on hand, courtesy of a local Olympia farm. If you have some like this, rub it between your hands to break it down and release its oils as you sprinkle it over the dish. This is the easiest way to maximize the flavor.

Try tossing these veggies into a bowl of hot bow tie pasta that has been mixed with goat cheese. It’s becomes a decadent, healthy macaroni and cheese.

The blistered tomatoes should be cooked until they wrinkle out of shape, if they’re still firm when you pull them out of the oven, be careful. They’ll squirt when you puncture them!

20130617-IMG_5464And if any of you moms out there have tips on homemade baby food, or preventing your child from becoming a picky eater, do tell!

A Picnic-Worthy Fruit Salad

A Picnic Worthy Fruit Salad | Yea Yea Pueblo

Here I am, five weeks postpartum and I’m going through some serious sugar withdrawals. They’re bad. The irritability and cookie cravings are out of control, I tell you

Pregnancy was super fun because I enjoyed a faster metabolism and eating under the guise of  ‘hormones’. I gained a sturdy 29 lbs over the 41+ weeks I was pregnant, and it’s unfortunately not coming off as quickly as I had anticipated. I even started exercising again, but it’s not nearly as easy as I remember it (especially after a cesarean!). Isaac and I were up to 10 miles on our long-distance runs when I found out I was pregnant. Now I can hardly complete one full mile. It’s discouraging.

Knowing what had to be done (as it never should have begun), I decided to kick my cookie, ice cream and candy habit. At least until the next pregnancy, wink-wink.

A Picnic Worthy Fruit Salad | Yea Yea PuebloA Picnic Worthy Fruit Salad | Yea Yea Pueblo

I remember trying to kick my life-long sugar habit in college, and I did it with this fruit salad. It’s become my signature bring-along over the last 8 years since it truly never disappoints. Preparing this fruit salad brings back fond memories of music festivals, barbecues, hiking trips, and potlucks. Each event was the perfect occasion to bring along this fruit salad.

It’s incredibly simple, and healthy, and requires basic ingredients you probably already have in your kitchen.

I’ll be chowing down on this until I can see my sugar cravings in the rear-view mirror.

A Picnic Worthy Fruit Salad | Yea Yea Pueblo

My Picnic-Worthy Fruit Salad “Recipe”

Ingredients

1 Large Honey Crisp apple, or 3 small ones. This should total 2-3 cups.

1-2 Bananas, depending on size. I prefer to buy the longer ones.

1 single-serve container of Greek Vanilla Yogurt, approximately 5 ounces.

2/3 cup Granola, I always use Kashi’s Go Lean Crunch.

Directions

1. Chop apples into bite size pieces.

2. Slice banana into bite size pieces.

3. In a large mixing bowl, combine apples, bananas, and yogurt. Mix until coated evenly.

4. Sprinkle granola mixture over the top of the salad, and serve.

A Picnic Worthy Fruit Salad | Yea Yea Pueblo

Notes

-Keep the granola separate until you’re ready to serve, if you mix it in prematurely, and the fruit salad sits for a period of time, the granola gets soggy.

-The ratio of apples to bananas should be roughly 1:1.

-I’ve always used vanilla yogurt, feel free to try out Strawberry, Orange, or another fruit-flavored yogurt instead.

-Kashi Go Lean Crunch is a staple around my house, if you have another granola based cereal, or snack at hand, feel free to try it out instead.

-Tart Apples tend to do this dish an injustice, I highly recommend sticking with Honey Crisp or Red Delicious.

-You can also throw in some grapes, or strawberries, but just like the childhood song, I like to eat apples & bananas.

A Picnic-Worthy Fruit Salad | Yea Yea Pueblo

Saturday Brunch featuring Soyrizo Frittata

I’m probably not the only Washingtonian wondering why the weather stays sunny and dry during the week, then rains like crazy on the weekends. Well, it does. So it’s a good thing my husband and I went for our weekly long distance run yesterday, when the rain wasn’t as heavy. For some insane reason, he wants to run a marathon. I’m trying to be a supportive running partner, but because I’m only half-crazy, I have no desire to run any further than a half-marathon. This is about the biggest problem we have at the six month mark into our marriage. Another concern is that I’m constantly cooking him vegetarian meals. Most of the time he doesn’t notice, but occasionally he “needs” a meal with red meat. Today’s brunch was one of those occasions, faked.

While the rain beat down outside, I whipped up my favorite Mexican inspired frittata. And let me preface the meal description with this: I may have dropped my Mexican maiden name, but that in no way means I’ve abandoned my Mexican ways. I still love chorizo and eggs. That will never change.

Instead of the traditional pork based sausage, I use soyrizo, a brilliant and delicious substitute. I like Trader Joe’s take on Soyrizo, but there are other options.

Image

For this recipe, which is adapted from a master recipe formula by Pam Anderson, you’ll need the following:

  • 8 large eggs
  • 1/4 cup goat cheese (or feta, queso fresco, parmesan etc.)
  • 1/2 cup shredded mozzarella
  • 1/2  yellow onion, chopped
  • 1 heaping handful of arugula
  • 1 1/2 cups of Soyrizo, or half of the included package
  • 2 tablespoons of minced garlic
  • 1 tablespoon olive oil
  • Cracked pepper to taste
  • Sea salt to taste
  • 1 cup halved plum tomatoes to garnish

Move your oven rack to the highest position in the oven. Turn oven on to broil (set to high if the setting is available).

In a large mixing bowl, combine the eggs, cheese and salt & pepper. Mix evenly.

Turn the stove to medium-high and coat the oven safe cast iron pan with the olive oil. When it’s glistening, add the chopped onions, arugula, minced garlic and Soyrizo. Cook until the onions are translucent (about 5 minutes). Then turn the heat down to medium and make sure the ingredients are evenly distributed across the pan. Add the egg mixture. Once the eggs start to set around the edges, place cast iron pan in the oven.

Broil the dish for 3-5 minutes, until the surface is lightly golden brown. Let it sit for 5 minutes to cool then garnish with tomatoes and arugula. Serve and enjoy!

Also, if you haven’t picked up Pam Anderson’s Cook Without a Book: Meatless Meals, you should! It’s my cookbook bible.